http://huuphang.blogspot.com/ my blogs redirect to http://linuxoperatingsystem.info/
Thanks^_^
Copyright by: www.linuxoperatingsystem.info http://goo.gl/kMscJ4
# mysqladmin -u root password NEWPASSWORD
# mysqladmin -u root -p'oldpassword' password newpass
# mysql -u root -p
mysql> CREATE DATABASE myDB;
mysql> CREATE USER 'newuser'@'localhost' IDENTIFIED BY 'password';
mysql> GRANT ALL PRIVILEGES ON *.* TO 'newuser'@'localhost';
mysql> FLUSH PRIVILEGES;
mysql> GRANT ALL PRIVILEGES ON [database name].[table name] TO ‘[username]’@'localhost’;Note: All permission user for database name
mysql> GRANT [type of permission] UPDATE,INSERT ON [database name].[table name] TO ‘[username]’@'localhost’;
# mysqldump -u root -p[root_password] [database_name] > dumpfilename.sqlFor example
# mysql -u root -p[root_password] [database_name] < dumpfilename.sql
# mysqldump -u user01 -p123 mydb > dumpfilename.sqlRestore
# mysql -u user01 -p123 mydb < dumpfilename.sql
mysql> SELECT table_schema "Data Base Name", SUM( data_length + index_length) / 1024 / 1024 "Data Base Size in MB" FROM information_schema.TABLES GROUP BY table_schema;
# python server.py &
[root@localhost project]# jobs
[1]+ Running python server.py &
[root@localhost project]# kill %1
[root@localhost project]# jobs
[1]+ Terminated python server.py
[root@localhost project]# ps aux | grep server.py
root 1244 0.0 0.8 11068 4312 pts/0 S 16:47 0:00 python server.py
root 1246 0.0 0.1 4356 740 pts/0 S+ 16:47 0:00 grep server.py
[root@localhost project]# kill -9 1244
[root@localhost project]# jobsCopyright by: www.linuxoperatingsystem.info http://goo.gl/kMscJ4
[1]+ Running python server.py &
[root@localhost project]# fg 1
python server.py
^C
# yum install openldap*Step 2: Now generate a encrypted password for Administrator User That is "Admin"
# slappasswdNOTE: You need to copy above generated password to text
# vi /etc/openldap/slapd.d/"cn=config"/"olcDatabase={2}bdb.ldif"Change
olcSuffix: dc=linuxoperatingsystem,dc=infoStep 4: Now specify the Monitoring privileges
olcRootDN: cn=Admin,dc=linuxoperatingsystem,dc=info
olcRootPW: <paste encrypted="" here="" password="" your=""> ( copy password at step 2 )
olcTLSCertificateFile: /etc/pki/tls/certs/linuxoperatingsystem.pem
olcTLSCertificateKeyFile: /etc/pki/tls/certs/linuxoperatingsystemkey.pem
# vi /etc/openldap/slapd.d/"cn=config"/"olcDatabase={1}monitor.ldif"Chage
"cn=manager,dc=linuxoperatingsystem,dc=info"to
"cn=Admin,dc=linuxoperatingsystem,dc=info"Step 5: Now copy the sample database file
#cp /usr/share/openldap-servers/DB_CONFIG.example /var/lib/ldap/DB_CONFIGStep 6: Configure OpenLDAP to listen on SSL/TLS
#chown -R ldap:ldap /var/lib/ldap/
# vi /etc/sysconfig/ldapStep 7: Now you need to create a certificate for OpenLDAP Server.
SLAPD_LDAPS=yes #(default is no)
# openssl req -new -x509 -nodes -out /etc/pki/tls/certs/linuxoperatingsystem.pem -keyout /etc/pki/tls/certs/linuxoperatingsystemkey.pem -days 365Step 8:You need to change owner and group ownership of certificate and keyfile
#chown -Rf root:ldap /etc/pki/tls/certs/linuxoperatingsystem.pemStep 9: Start/Restart the service of OpenLDAP
#chown -Rf root:ldap /etc/pki/tls/certs/linuxoperatingsystemkey.pem
# service slapd restartStep 10: Now you need to create base objects in OpenLDAP.
# chkconfig slapd on
# yum install migrationtoolson the Line Number 61, change "ou=Groups"
# cd /usr/share/migrationtools/
# ls
# vi migrate_common.ph
$NAMINGCONTEXT{'group'} = "ou=Groups";on the Line Number 71, change your domain name
$DEFAULT_MAIL_DOMAIN = "linuxoperatingsystem.info";on the line number 74, change your base name
$DEFAULT_BASE = "dc=linuxoperatingsystem,dc=info";on the line number 90, change schema value
$EXTENDED_SCHEMA = 1;For example: Creating 2 local users and groups and then I will migrate to LDAP
# useradd -d /home/ldapuser1 ldapuser1Now assign the password
# useradd -d /home/ldapuser2 ldapuser2
# passwd ldapuser1Now you need to filter out these users from /etc/passwd to another file:
# passwd ldapuser2
# getent passwd | tail -n 2 > /root/usersNow you need to filter out password information from /etc/shadow to another file:
# getent shadow | tail -n 2 > /root/passwordsNow you need to filter out user groups from /etc/group to another file:
# getent group | tail -n 2 > /root/groupsSo Open the following file to change the location of password file
# vi migrate_passwd.plInside this file search /etc/shadow and change it to /root/passwords and then save and exit.
#./migrate_base.pl > /root/base.ldifNow generate a ldif file for users
# ./migrate_passwd.pl /root/users > /root/users.ldifNow Generate a ldif file for groups
# ./migrate_group.pl /root/groups > /root/groups.ldifStep 11: Now it' time to upload these ldif file to LDAP Server
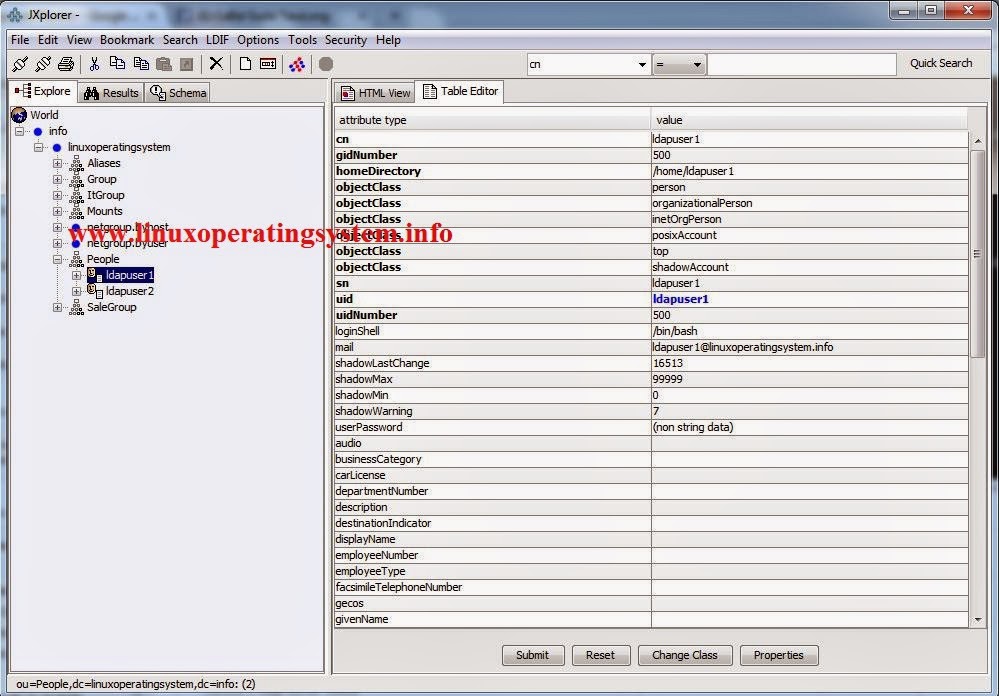
# ldapadd -x -W -D "cn=Admin,dc=linuxoperatingsystem,dc=info" -f /root/base.ldif
# ldapadd -x -W -D "cn=Admin,dc=linuxoperatingsystem,dc=info" -f /root/users.ldif
# ldapadd -x -W -D "cn=Admin,dc=linuxoperatingsystem,dc=info" -f /root/groups.ldif
# vi /etc/rsyslog.confAdd line following below into rsyslog.conf
# LDAPRestart Rsyslog server
local4.* /var/log/ldap.log
# /etc/init.d/rsyslog restart
# /etc/init.d/slapd restartNow you can use "ldapsearch" command
# ldapsearch -x -b "dc=linuxoperatingsystem,dc=info"


grub> find (hd -->TAB keyList available disk partition at grub prompt
grub> find (hd0, -->TAB keyExamples of find command a grub.conf file
grub> find (hd0,0)//grub/grub.conf
(hd0,0)
(hd0,1)
(hd0,2)
grub> find (hd0,0)/boot/grub/grub.conf
Error 15: File not found
grub> root (hd0,0)For example my system:
grub> kernel /vmlinuz-2.6.32-431.el6.i686 ro root=/dev/sda1
grub> initrd /initramfs-2.6.32-431.el6.i686.img
grub> boot
# fdisk -l
 |
# ls -la /boot

$ sudo apt-get update
$ sudo apt-get install ibus-unikey
$ sudo reboot
$ ibus-daemon -d
$ ibus-setup


Add line following below /etc/X11/xinit/xinput.d/default file :#sudo apt-get install ibus-qt4
# /etc/X11/xinit/xinput.d/default
#
XIM=ibus
XIM_PROGRAM=/usr/bin/ibus-daemon
XIM_ARGS="--xim"
XIM_PROGRAM_XTRA=
# Set following variable to non-zero string if program set itself as deamon
XIM_PROGRAM_SETS_ITSELF_AS_DAEMON=
#
# Define GTK and QT IM module
# They may or may not be using xim as the IM.
#
GTK_IM_MODULE=ibus
QT_IM_MODULE=ibus
#
# Define lists of packages neded for above IM to function
#
DEPENDS="ibus, ibus-gtk, ibus-gt4"
#
# Define X start up hook script to update IM environment
#
# rebootOutput:

$ apt-cache search nloadSearch the list of installed packages
$ dpkg-query -S mountList all the files contained in the initscripts package
$ dpkg -L initscriptsRefresh the list of cached packages
$ sudo apt-get update
$ apt-cache statsOutput:
Total package names: 60926 (1,219 k)
Total package structures: 102901 (5,762 k)
Normal packages: 71359
Pure virtual packages: 1187
Single virtual packages: 9068
Mixed virtual packages: 1825
Missing: 19462
........
$ sudo vim /etc/apt/sources.listIn a minimal system install, adding software collections with tasksel
$ sudo tasksel
$ sudo apt-get updateTo fid packages in any available repository
$ apt-cache search [package-name]Install package
$ sudo apt-get install [package-name]Display information about the software
$ apt-cache show [package-name]Check updates for all installed packages and then prompt to download and install them with this command
$ sudo apt-get upgradeRun this command anytime to delete partially downloaded packages, or packages no longer installed
$ sudo apt-get autocleanRemove all cached packages from /var/cache/apt/archives to free up disk space using this command
$ sudo apt-get cleanThis command removes the named package and all its confiuration fies
$ sudo apt-get --purge remove [package-name]This command does a sanity check for broken packages. This tries to fix any
$ sudo apt-get -f installThis command lists GPG keys that APT knows about
$ sudo apt-key listCheck for dependencies the packages
$ sudo apt-cache depends [package-name]Removing packages
$ sudo apt-get remove [package-name]Clean up packages
$ find /var/cache/apt/ -name \*.debDownloading packages
$ sudo apt-get clean
$ sudo apt-get download [package-name]
$ dpkg -lThis command lists all the files that have been installed from a package
$ dpkg -L [package-name]Install a package
$ sudo dpkg -i [package-name]Remove a package
$ sudo dpkg -r [package-name]Remove package and configuration file
$ sudo dpkg -P [package-name]Verifying install packages with debsums
$ debsums -a Check all files, include config files left out by default
$ debsums –e Check config files for packages only
$ debsums –c List only changed files to stdout
$ debsums –l List files that don't have md5sum info
$ debsums –s List only errors; otherwise be silent
$ debsums package List the packages you want debsums to analyze


%2Bubuntu%2B14.10.JPG)

