Showing posts with label Centos. Show all posts

Wednesday, March 18, 2015

ldap server configuration in centos 6 step by step

Leave a Comment
In this articles, how to install and configuration openldap in centos 6 step by step. openldap run 2 port: 389 ( insecure ) and 636 ( secure )

What does CN, OU, DC mean?

CN = infomon Name
OU = Organizational Unit
DC = Domain infoponent

Installing and configuration openldap server on in centos 6 

Step 1: Install LDAP
# yum install openldap*
Step 2: Now generate a encrypted password for Administrator User That is "Admin"
# slappasswd
NOTE: You need to copy above generated password to text

Step 3: Edit the following file:
# vi /etc/openldap/slapd.d/"cn=config"/"olcDatabase={2}bdb.ldif"
Change
olcSuffix: dc=linuxoperatingsystem,dc=info
olcRootDN: cn=Admin,dc=linuxoperatingsystem,dc=info
olcRootPW: <paste encrypted="" here="" password="" your=""> ( copy password at step 2 )
olcTLSCertificateFile: /etc/pki/tls/certs/linuxoperatingsystem.pem
olcTLSCertificateKeyFile: /etc/pki/tls/certs/linuxoperatingsystemkey.pem
Step 4: Now specify the Monitoring privileges
# vi /etc/openldap/slapd.d/"cn=config"/"olcDatabase={1}monitor.ldif"
Chage
"cn=manager,dc=linuxoperatingsystem,dc=info" 
 to
"cn=Admin,dc=linuxoperatingsystem,dc=info"
Step 5:  Now copy the sample database file
#cp /usr/share/openldap-servers/DB_CONFIG.example /var/lib/ldap/DB_CONFIG
#chown -R ldap:ldap /var/lib/ldap/
Step 6: Configure OpenLDAP to listen on SSL/TLS
# vi /etc/sysconfig/ldap
SLAPD_LDAPS=yes #(default is no)
Step 7: Now you need to create a certificate for OpenLDAP Server.
# openssl req -new -x509 -nodes -out /etc/pki/tls/certs/linuxoperatingsystem.pem -keyout /etc/pki/tls/certs/linuxoperatingsystemkey.pem -days 365
Step 8:You need to change owner and group ownership of certificate and keyfile
#chown -Rf root:ldap /etc/pki/tls/certs/linuxoperatingsystem.pem
#chown -Rf root:ldap /etc/pki/tls/certs/linuxoperatingsystemkey.pem
Step 9:  Start/Restart the service of OpenLDAP
# service slapd restart
# chkconfig slapd on
Step 10: Now you need to create base objects in OpenLDAP.

Create it manually or use migration tools to automation

I use tool to create .ldif file :
# yum install migrationtools
# cd /usr/share/migrationtools/
# ls
# vi migrate_common.ph
on the Line Number 61, change "ou=Groups"
  $NAMINGCONTEXT{'group'}             = "ou=Groups";
  on the Line Number 71, change your domain name
$DEFAULT_MAIL_DOMAIN = "linuxoperatingsystem.info";
on the line number 74, change your base name
$DEFAULT_BASE = "dc=linuxoperatingsystem,dc=info";
on the line number 90, change schema value
$EXTENDED_SCHEMA = 1;
For example: Creating 2 local users and groups and then I will migrate to LDAP
# useradd -d /home/ldapuser1 ldapuser1
# useradd -d /home/ldapuser2 ldapuser2
Now assign the password
# passwd ldapuser1
# passwd ldapuser2
Now you need to filter out these users from /etc/passwd to another file:
# getent passwd | tail -n 2 > /root/users
Now you need to filter out password information from /etc/shadow to another file:
# getent shadow | tail -n 2 > /root/passwords
Now you need to filter out user groups from /etc/group to another file:
# getent group | tail -n 2 > /root/groups
So Open the following file to change the location of password file
# vi migrate_passwd.pl
Inside this file search /etc/shadow and change it to /root/passwords and then save and exit.

Now generate a base.ldif file for your Domain, use the following:
#./migrate_base.pl > /root/base.ldif
Now generate a ldif file for users
# ./migrate_passwd.pl /root/users > /root/users.ldif
Now Generate a ldif file for groups
# ./migrate_group.pl /root/groups > /root/groups.ldif
Step 11: Now it' time to upload these ldif file to LDAP Server
# ldapadd -x -W -D "cn=Admin,dc=linuxoperatingsystem,dc=info" -f /root/base.ldif
# ldapadd -x -W -D "cn=Admin,dc=linuxoperatingsystem,dc=info" -f /root/users.ldif
# ldapadd -x -W -D "cn=Admin,dc=linuxoperatingsystem,dc=info" -f /root/groups.ldif

Enable log openldap Server

# vi /etc/rsyslog.conf
Add line following below into rsyslog.conf
# LDAP
local4.* /var/log/ldap.log
Restart Rsyslog server
# /etc/init.d/rsyslog restart

Restart openldap server

# /etc/init.d/slapd restart
Now you can use "ldapsearch" command
# ldapsearch -x -b "dc=linuxoperatingsystem,dc=info"

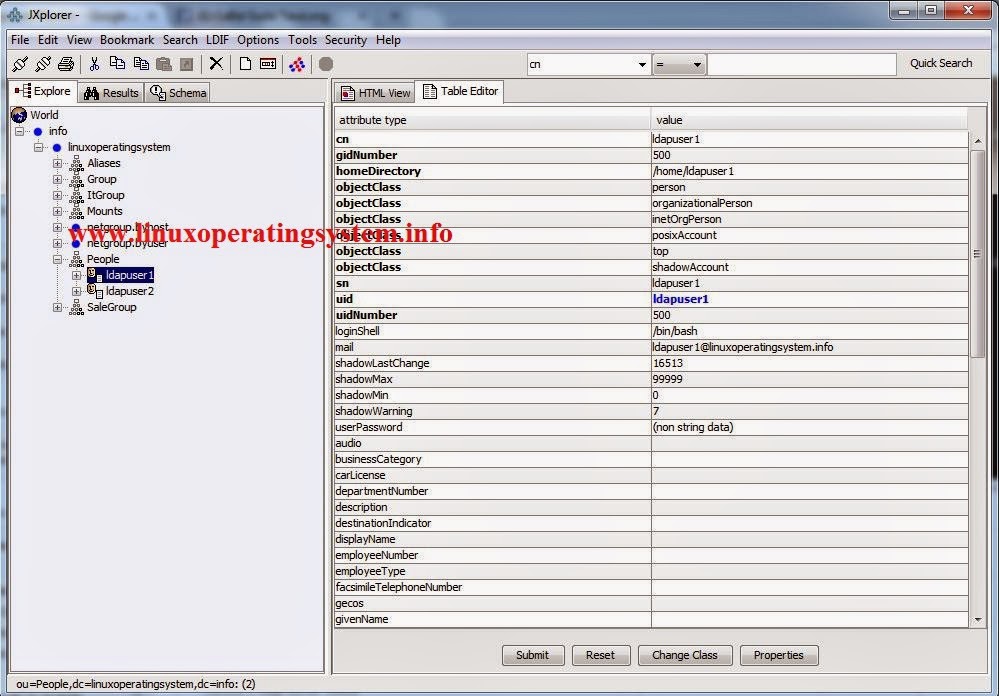
Test connect to Openldap server

I use JXplorer software as picture below :


Output:


Link youtube ldap server configuration in centos 6 step by step


Copyright by: www.linuxoperatingsystem.info http://goo.gl/kMscJ4
Read More...

Sunday, March 15, 2015

Centos grub boot missing

Leave a Comment
Redhat/Centos grub boot  missing. in order to boot from the Redhat/CentOS box with grub problems, you need to know 2 things:
  • The /boot partition
  • The root (/) partition.
Problem Redhat/centos grub boot missing not login into server.

grub boot

Step 1: find the /boot partition/

List available disks at grub prompt
grub> find (hd        -->TAB key
List available disk partition at grub prompt
grub> find (hd0,        -->TAB key
Examples of find command a grub.conf file

grub> find (hd0,0)//grub/grub.conf
   (hd0,0)
   (hd0,1)
   (hd0,2)

grub> find (hd0,0)/boot/grub/grub.conf
   Error 15: File not found

Step 2: The root (/) partition.

grub> root (hd0,0)
grub> kernel /vmlinuz-2.6.32-431.el6.i686 ro root=/dev/sda1
grub> initrd /initramfs-2.6.32-431.el6.i686.img
grub> boot
For example my system:
# fdisk -l
grub boot 02

# ls -la  /boot
grub boot 01

Redhat/Centos grub boot  missing, the linux commands above helpful you! 

Copyright by: www.linuxoperatingsystem.info http://goo.gl/kMscJ4
Read More...

Saturday, February 14, 2015

monit - mailserver for google apps email

Leave a Comment

Monit - mailserver for google apps email

# vi /etc/monit.conf
Add following bellow:
set mail-format {
      from: monit@$HOST
   subject: monit alert --  $EVENT $SERVICE
   message: $EVENT Service $SERVICE
                 Date:        $DATE
                 Action:      $ACTION
                 Host:        $HOST
                 Description: $DESCRIPTION
            Your faithful employee,
            Monit
}
set alert useraccount@gmail.com not on { instance, action } #Set mail receive
set mailserver smtp.gmail.com port 587
    username "useraccount@gmail.com" password "password-gmail"
    using tlsv1
    with timeout 10 seconds
Copyright by: www.linuxoperatingsystem.info http://goo.gl/kMscJ4
Read More...

Thursday, February 5, 2015

iptables examples

Leave a Comment
In this articles, we are create iptables examples, iptables places rules into predefined chains (INPUT, OUTPUT and FORWARD). These chains are:
  • INPUT - All packets destined for the host computer.
  • OUTPUT - All packets originating from the host computer.
  • FORWARD - All packets neither destined for nor originating from the host computer, but passing through (routed by) the host computer. This chain is used if you are using your computer as a router. 

iptables examples

Clear existing rule
# iptables -F
Set the default INPUT chain policy
# iptables -P input DENY
Note: if you use remote ssh then DENY -> ACCEPT, then you ACCEPT--> DENY when set rule allow ssh

FTP

# iptables -A INPUT -i eth0 -p tcp -s any/0 --sport 1024:65535 -d MY.IP.ADDR --dport 21 -j ACCEPT
#iptables -A INPUT -i eth0 -p tcp -s any/0 --sport 1024:65535 -d MY.IP.ADDR --dport 20 -j ACCEPT

DNS

#iptables -A INPUT -i eth0 -p udp -s any/0 --sport 1024:65535 -d MY.IP.ADDR --dport 53 -j ACCEPT
#iptables -A INPUT -i eth0 -p tcp -s any/0 --sport 1024:65535 -d MY.IP.ADDR --dport 53 -j ACCEPT

Telnet

#iptables -A INPUT -i eth0 -p tcp -s any/0 --sport 1024:65535 -d MY.IP.ADDR --dport 23 -j ACCEPT

SSH

#iptables -A INPUT -i eth0 -p tcp -s any/0 --sport 1024:65535 -d MY.IP.ADDR --dport 22 -j ACCEPT

Email

# iptables -A INPUT -i eth0 -p tcp ! --syn -s EMAIL.NET.IP.ADDR --sport 25 -d MY.IP.ADDR --dport 1024:65535 -j ACCEPT
Note: ! --syn : added level of security that confirms that the packet coming in is really a reply packet to one we've sent out This rule will not allow inbound email messages to come in to the sendmail service on the server

HTTP/HTTPS

#iptables -A INPUT -i eth0 -p tcp -d MY.IP.ADDR --dport 80 -j ACCEPT
#iptables -A INPUT -i eth0 -p tcp -d MY.IP.ADDR --dport 443 -j ACCEPT

ICMP:

# iptables -A INPUT -i eth0 -p icmp -d MY.IP.ADDR -j ACCEPT

DDOS

# iptables -A INPUT -s IP.machine/32 -j DROP
# iptables -A INPUT -s 127.0.0.0/8 -j DROP
# iptables -A INPUT -p tcp --tcp-flags ALL FIN,PSH,URG -j DROP
# iptables -A INPUT -p icmp -m limit --limit 2/second --limit-burst 2 -j ACCEPT
# iptables -A INPUT -p tcp -m state --state NEW -m limit --limit 2/second --limit-burst 2 -j ACCEPT
Review and save Rules
# iptables -L  
#/etc/init.d/iptables save
Or
#service iptables save

Copyright by: www.linuxoperatingsystem.info http://goo.gl/kMscJ4
Read More...

Thursday, December 11, 2014

How to reset root password on centos 7

Leave a Comment
Many methods to reset root password centos 7. if GRUB 2 bootloader then no longer using in single-user mode as well as emergency mode. To below step by step to reset root password  centos 7.

Step 1: Start the system, on Grub 2 boot screen, you press the e key as shown below.
reset root password centos 7

Step 2:  In linux16 line or linuxefi on UEFI system, add parameters end line as shown below.
# rw init=/bin/bash
reset-root-password-centos-7 02

Note: reset root password  centos 7

Using Ctrl+A or Ctrl+E to start or end a line.
Disable paramenters the rhgb and quiet in order to enable system message as shown top.

Step 3: you press Ctrl+x to start single user mode
# password
Step 4: update selinux information
#touch /.autorelabel
Step 5: To resume the initialization and finish the system boot.
#exec /sbin/init
reset-root-password-centos-7 03

Link Youtube how to reset root password on centos 7


*In linux and unix-like operating system, Reset root password  centos 7 useful to administrator  when you forgotten root password, you can recover  very easy.

Copyright by: www.linuxoperatingsystem.info http://goo.gl/kMscJ4
Read More...

Friday, December 5, 2014

nagios installation on centos 7

Leave a Comment
In this articles, how to nagios installation on centos 7, The Nagios to monitoring for your system such as: CPU load, disk usage,etc. it's open soure and design for linux operating system.

After nagios installation end up

  • Nagios and plugins is installed in /usr/local/nagios
  • Nagios to monitor of your system ( CPU load, disk usage, etc.)
  • Nagios web interface at http://localhost/nagios/

Nagios installation the prerequisites 

You are sure installed the packages below before install nagios
  • Apache
  • PHP
  • GCC compiler
  • GD development libraries

 Nagios installation

you can check the packages Apache, PHP, GCC compiler and GD development libraries installed in your system use command line below:
rpm -qa
 [root@localhost ~]# rpm -qa gcc glibc glibc-common httpd php gd gd-devel
glibc-2.17-55.el7.x86_64
glibc-common-2.17-55.el7.x86_64
gcc-4.8.2-16.el7.x86_64
httpd-2.4.6-17.el7.centos.1.x86_64
php-5.4.16-21.el7.x86_64
 OR
yum list installed
[root@localhost ~]# yum list installed
Loaded plugins: fastestmirror
Loading mirror speeds from cached hostfile
 * base: mirrors.vhost.vn
 * extras: mirror.vietoss.com
 * updates: mirror.vietoss.com
Installed Packages
ModemManager-glib.x86_64         1.1.0-6.git20130913.el7              @anaconda
NetworkManager.x86_64            1:0.9.9.1-13.git20140326.4dba720.el7 @anaconda
NetworkManager-glib.x86_64       1:0.9.9.1-13.git20140326.4dba720.el7 @anaconda
NetworkManager-tui.x86_64        1:0.9.9.1-13.git20140326.4dba720.el7 @anaconda
acl.x86_64                       2.2.51-12.el7                        @anaconda
aic94xx-firmware.noarch          30-6.el7                             @anaconda
alsa-firmware.noarch             1.0.27-2.el7                         @anaconda
alsa-lib.x86_64                  1.0.27.2-3.el7                       @anaconda
alsa-tools-firmware.x86_64       1.0.27-4.el7                         @anaconda
apr.x86_64                       1.4.8-3.el7                          @anaconda
you can install the packages use command line below ( as root):
yum  install -y httpd php
yum  install -y gcc glibc glibc-common
yum install -y gd gd-devel

Create Account for nagios

useradd -m nagios
passwd nagios
Create group for nagios and nagios user, apache user to group
groupadd nagiosgroup
usermod -a -G nagiosgroup nagios
usermod -a -G nagiosgroup apache
Download nagios and the plugins
mkdir ~/downloads
cd ~/downloads
wget http://prdownloads.sourceforge.net/sourceforge/nagios/nagios-4.0.8.tar.gz
wget http://nagios-plugins.org/download/nagios-plugins-2.0.3.tar.gz
Compile and install Nagios
cd ~/downloads
tar zxvf nagios-4.0.8.tar.gz
cd nagios-4.0.8
./configure --with-command-group=nagiosgroup
make all
make install
make install-init
make install-config
make install-commandmode

Configure nagios 

Sample configuration file are installed in /usr/local/nagios/etc/ directory
Configure the web interface
make install-webconf
Create a nagiosadmin account for logging into the web interface
htpasswd -c /usr/local/nagios/etc/htpasswd.users nagiosadmin
Restart Apapche
service httpd restart
Compile and install the nagios Plugins
cd ~/downloads
tar zxvf nagios-plugins-2.0.3.tar.gz
cd nagios-plugins-2.0.3
./configure --with-nagios-user=nagios --with-nagios-group=nagios
make
make install

Start Nagios

Enable nagios automatically start when the system boot
chkconfig --add nagios
chkconfig nagios on
Verify the sample Nagios configuration file
/usr/local/nagios/bin/nagios -v /usr/local/nagios/etc/nagios.cfg
Start nagios
service nagios start
You done! you have nagios installation in centos 7

Modify SELinux 

Default SELinux in Enforcing mode. This is result in "Internal Server Erros" message when you access the Nagios CGIs.
check SELinux is in mode.
getenforce
Set SELinux into Permissive mode use command line
setenforce 0
To make this change permanent you edit in /etc/selinux/config file and reboot

Login to the web interface
http://localhost/nagios/
Or ip address of nagios
http://192.168.1.132/nagios/ 
nagios installation

I hope will this help you!
Copyright by: www.linuxoperatingsystem.info http://goo.gl/kMscJ4
Read More...

Wednesday, November 26, 2014

linux firewall

Leave a Comment
In this articles, description about firewall architecture and some samples of linux firewall. Since the RedHat/Centos 7 firewall replaced with firewalld.


linux firewall


Types of firewalls

2 types filtering firewalls and proxy servers
  • filtering firewalls build to linux kernel and it works at the network level.
  • proxy servers: 2 type is Application and SOCKS Proxies

Firewall Architecture

There are many way to protect for you systems using firewall. examples below:

Dial-up Architecture

<internet>----[Firewall system]---<HUB/LAN>----[Workstation/s]
|
|
<DMZ/HUB>

Note: this architecture, you full control over internet services.

Single Router Architecture

<internet>---[Router/cable Mdm]---<DMZ/HUB>----[Firewall system]---<LAN/HUB>--[workstation/s]
|
<Outside server>

Note: if you own the router then set some hard filter rules in this router. else, this router is owned by ISP, then you can not controls,you ask ISP to put in filters.

Firewall and Proxy server

<internet>---[proxy/Firewall system]-----<hub/LAN>----[Wordstations]

Note: you can intergrate proxy into firewall system

OR: you can put proxy in LAN your system.
<internet>----[Firewall system]----<LAN/HUB>----[Workstations]
|
[Proxy server]

NOTE: Redundent internet??

Differences between firewalld and iptables service:

  • iptables service stores configuration in /etc/sysconfig/iptables. firewalld stores it in XML files in /usr/lib/firewalld and /etc/firewalld/
  • iptables every single change, it flushing all the old rules and reading all the new in /etc/sysconfig/iptables

what is network zone?


Drop: Only permit outgoing network and incoming network packets are drop

Block:
 Any incoming network connections are rejected

Public:
default of firewalld

External:
For use on external networks with masquerading enabled especially for routers

dmz:
 For computers in your demilitarized zone that are publicly-accessible with limited access to your internal network. Only selected incoming connections are accepted.

work:
For use in work areas. You mostly trust the other computers on networks to not harm your computer. Only selected incoming connections are accepted.

home:
For use in home areas. You mostly trust the other computers on networks to not harm your computer. Only selected incoming connections are accepted.

internal:
For use on internal networks. You mostly trust the other computers on the networks to not harm your computer. Only selected incoming connections are accepted.

trusted:
 All network connections are accepted

Some command line and configuration file in linux firewall


Start firewalld
systemctl start firewalld
Checking firewalld running
systemctl status firewalld
Install firewalld
yum install firewalld
Disabling firewalld
systemctl disable firewalld
systemctl stop firewalld

Using the iptables Service
systemctl disable firewalld
systemctl stop firewalld
yum install iptables-services
Start iptables and ip6tables:
systemctl start iptables
systemctl start ip6tables
systemctl enable iptables
systemctl enable ip6tables
Configuring the firewall using command line (firewall-cmd)

To display of the state:
firewall-cmd --state
To view the list of active zones:
firewall-cmd --get-active-zones
To find out all setting of a zone:
firewall-cmd --zone=public --list-all
Drop all packets (panic mode)
firewall-cmd --panic-on
Start all packets again
firewall-cmd --panic-off
To find out panic mode enable or disable
firewall-cmd --query-panic
if yes is enables, else no then disable

Reload firewall 

Reload firewall rules and keep state information
firewall-cmd --reload
if there are state information problems that no connection can be established with correct firewall rules. the state information will be lost. 
firewall-cmd --complete-reload
Examples linux firewall use configuration file and command line:

Example 1: Configuration public.xml file accept service http pass to firewall

[root@localhost zones]# vi public.xml
<?xml version="1.0" encoding="utf-8"?>
<zone>
  <short>Public</short>
  <description>For use in public areas. You do not trust the other computers on networks to not harm your computer. Only selected incoming connections are accepted.</description>
  <service name="dhcpv6-client"/>
  <service name="ssh"/>
<rule family="ipv4">
    <source address="192.168.1.0/24"/>
    <service name="http"/>
    <accept/>
  </rule>
</zone>
Example 2: use firewall-cmmd accept service http pass to firewall
firewall-cmd --permanent --zone=public --add-rich-rule='rule family="ipv4" source address="192.168.1.0/24" service name="http" accept'
Other command line:
firewall-cmd --permanent --zone=<zone> --add-service=http
firewall-cmd --permanent --zone=<zone> --add-port=80/tcp
firewall-cmd --zone=<zone> --query-port=80/tcp
firewall-cmd --zone=<zone> --query-service=http

Restart linux firewall as above to affect the configuration file. 2 examples above same, it enable ip address network 192.168.1.0/24 accept access service http.
I hope will this help you!
Copyright by: www.linuxoperatingsystem.info http://goo.gl/kMscJ4
Read More...

Sunday, November 23, 2014

how to install wordpress 4 on centos 7

Leave a Comment
The first, install lamp install, then install wordpress on centos 7. Step-by-step install wordpress on centos 7 as below:

Step 1: Create a MySQL database and user for wordpress

# mysql -u root -p
Create new database
CREATE DATABASE wordpress;
Create new account and password
CREATE USER wordpressuser@localhost IDENTIFIED BY 'password';
GRANT ALL PRIVILEGES ON wordpress.* TO wordpressuser@localhost IDENTIFIED BY 'password';
FLUSH PRIVILEGES;
exit

Step 2: Install wordpress

The first, install php-gd package,then start to apache server
# yum install php-gd
# service httpd restart
Download wordpress latest
# wget http://wordpress.org/latest.tar.gz
Extract the archive
# tar xzvf latest.tar.gz
# rsync -avP ~/wordpress/ /var/www/html/ 
Create a folder for WordPress to store uploaded files
# mkdir -p /var/www/html/wp-content/uploads
Assign the correct ownership and permissions to our WordPress files and folders
# chown -R apache:apache /var/www/html/*

Step 3: Configure Wordpress

# cd /var/www/html
# cp wp-config-sample.php wp-config.php
vi wp-config.php
// ** MySQL settings - You can get this info from your web host ** //
define('DB_NAME', 'wordpress');
/** MySQL database username */
define('DB_USER', 'wordpressuser');
/** MySQL database password */
define('DB_PASSWORD', 'password');
/** The name of the database for WordPress */

Step 4: The finish install wordpress 4 on centos 7

install wordpress

You have a install wordpress  on centos 7. I hope will this help you!
Copyright by: www.linuxoperatingsystem.info http://goo.gl/kMscJ4
Read More...

lamp install on centos 7

Leave a Comment
in this articles, lamp ( linux, apache, mariaDB, PHP). how to lamp install on centos 7 ? Step-by-step lamp install on centos 7 below:

Step 1: Install Apache

Install, start and enable start on boot the apache server
yum install httpd
systemctl start httpd.service
systemctl enable httpd.service
Output:
lamp install

you enable port httpd or disable firewall to as picture above:
[root@localhost ~]# service firewalld stop

Step 2: Install MySQL (MariaDB)

Install MariaDB
yum install mariadb-server mariadb
systemctl start mariadb
mysql_secure_installation
systemctl enable mariadb.service

Step 3: Install PHP

Install and restart PHP
#yum install php php-mysql
#systemctl restart httpd.service

Install PHP Modules

yum search php-
[root@localhost ~]# yum search php-
Loaded plugins: fastestmirror
Loading mirror speeds from cached hostfile
============================== N/S matched: php- ===============================
php-cli.x86_64 : Command-line interface for PHP
php-common.x86_64 : Common files for PHP
php-gd.x86_64 : A module for PHP applications for using the gd graphics library
php-ldap.x86_64 : A module for PHP applications that use LDAP
php-mysql.x86_64 : A module for PHP applications that use MySQL databases
php-odbc.x86_64 : A module for PHP applications that use ODBC databases
php-pdo.x86_64 : A database access abstraction module for PHP applications
php-pear.noarch : PHP Extension and Application Repository framework
php-pecl-memcache.x86_64 : Extension to work with the Memcached caching daemon
php-pgsql.x86_64 : A PostgreSQL database module for PHP
php-process.x86_64 : Modules for PHP script using system process interfaces
php-recode.x86_64 : A module for PHP applications for using the recode library
php-soap.x86_64 : A module for PHP applications that use the SOAP protocol
php-xml.x86_64 : A module for PHP applications which use XML
php-xmlrpc.x86_64 : A module for PHP applications which use the XML-RPC protocol
  Name and summary matches only, use "search all" for everything.
To information packages use yum info, For example: information package php-gd below:
yum info <package-name>
[root@localhost ~]# yum info php-gd
Loaded plugins: fastestmirror
Loading mirror speeds from cached hostfile
Available Packages
Name        : php-gd
Arch        : x86_64
Version     : 5.4.16
Release     : 21.el7
Size        : 122 k
Repo        : LocalRepo
Summary     : A module for PHP applications for using the gd graphics library
URL         : http://www.php.net/
License     : PHP and BSD
Description : The php-gd package contains a dynamic shared object that will add
            : support for using the gd graphics library to PHP.

For example, install php-gd below:
yum install php-gd
Now, you have a lamp install on centos 7. I hop will this help you!
Copyright by: www.linuxoperatingsystem.info http://goo.gl/kMscJ4
Read More...

Saturday, November 22, 2014

static ip configuration in centos 7

Leave a Comment
in this articles, step-by-step static ip configuration in centos 7. default ifconfig command not found in centos 7 minimal as picture below:

static ip configuration


Solve problem:


Step1: create Local Yum repository on centos 7 using DVD:
# mkdir /cdrom
# mount /dev/cdrom /cdrom
# vi /etc/yum.repos.d/local.repo
static ip configuration 02


Add follow bellow to local.repo file:
[LocalRepo]
name=Local Repository
baseurl=file:///cdrom
enabled=1
gpgcheck=1
gpgkey=file:///etc/pki/rpm-gpg/RPM-GPG-KEY-CentOS-7

Step 2: use provides command or whatprovides command:
#yum provides ifconfig
or
#yum whatprovides ifconfig

static ip configuration 03

Step 3: install net-tools found as picture above: 
#yum install net-tools
#ifconfig –a
Step 4: static ip configuration in centos 7 as picture below:

static ip configuration 04


Static ip configuration in centos 7, output:

static ip configuration 06

Restart network
service network restart
I hope will this help you!
Copyright by: www.linuxoperatingsystem.info http://goo.gl/kMscJ4
Read More...

Thursday, November 20, 2014

how to install centos 7 minimal

Leave a Comment
in this articles, how to install centos 7 minimal. there are many methods to install, using DVD a common method. Step by step install centos 7 as picture below: 

Step 1: Select install centos 7 as picture below:

install centos 7

Step 2: Select language and click Continue as picture below:


Step 3: you configure DATE& TIME, KEYBOARD, INSTALLATION SOURCE, NETWORK & HOSTNAME, click SOFTWARE SELECTION next Step 4, click INSTALLATIONS DESTINATION next Step 5 as picture below:


Step 4: select Minimal install to install centos 7 as picture below, then click Done or you can select Basic Web Server, GNOME Desktop etc.


Step 5: configure partition: Automation or configure manually, then click Done as picture below:


Step 6: this step, Configuration USER SETTINGS next step 7 and USER CREATION next step 8 as picture below:


Step 7: Create password for user root , then click Done as picture below:


Step 8: Create user, then click Done as picture below:


Step 9: Click Reboot as picture below:


Step 10:  install centos 7 done!


i hope this will help you! Copyright by: www.linuxoperatingsystem.info http://goo.gl/kMscJ4
Read More...