Showing posts with label Linux Commands. Show all posts

Sunday, April 12, 2015

MySQL database on Linux Tutorial

Leave a Comment

Create password root the first

# mysqladmin -u root password NEWPASSWORD

Change password user root

# mysqladmin -u root -p'oldpassword' password newpass

Create a MySQL Database

# mysql -u root -p
mysql> CREATE DATABASE myDB;

How To Create a New User and Grant Permissions in MySQL

mysql> CREATE USER 'newuser'@'localhost' IDENTIFIED BY 'password';
mysql> GRANT ALL PRIVILEGES ON *.* TO 'newuser'@'localhost';
mysql> FLUSH PRIVILEGES;

How To Grant Different User Permissions

  • ALL PRIVILEGES- as we saw previously, this would allow a MySQL user all access to a designated database (or if no database is selected, across the system)
  • CREATE- allows them to create new tables or databases
  • DROP- allows them to them to delete tables or databases
  • DELETE- allows them to delete rows from tables
  • INSERT- allows them to insert rows into tables
  • SELECT- allows them to use the Select command to read through databases
  • UPDATE- allow them to update table rows
  • GRANT OPTION- allows them to grant or remove other users' privileges
mysql> GRANT ALL PRIVILEGES  ON [database name].[table name] TO ‘[username]’@'localhost’; 
Note: All permission user for database name
mysql> GRANT [type of permission] UPDATE,INSERT ON [database name].[table name] TO ‘[username]’@'localhost’;

Backup and restore mysql database

# mysqldump -u root -p[root_password] [database_name] > dumpfilename.sql
# mysql -u root -p[root_password] [database_name] < dumpfilename.sql
For example

Backup
# mysqldump -u user01 -p123 mydb  > dumpfilename.sql
Restore
# mysql -u user01 -p123 mydb  < dumpfilename.sql

Query to determine the size of tables in a database

mysql> SELECT table_schema "Data Base Name", SUM( data_length + index_length) / 1024 / 1024 "Data Base Size in MB" FROM information_schema.TABLES GROUP BY table_schema;

Copyright by: www.linuxoperatingsystem.info http://goo.gl/kMscJ4
Read More...

Wednesday, March 25, 2015

How to stop a background process in linux system

Leave a Comment
How to stop a background process in linux system? How many to stop a background process in linux system

For example running a background process:
# python server.py &

Method 1: use jobs command

[root@localhost project]# jobs
[1]+  Running                 python server.py &
[root@localhost project]# kill %1
[root@localhost project]# jobs
[1]+  Terminated              python server.py

Method 2: use ps command

[root@localhost project]# ps aux | grep server.py
root      1244  0.0  0.8  11068  4312 pts/0    S    16:47   0:00 python server.py
root      1246  0.0  0.1   4356   740 pts/0    S+   16:47   0:00 grep server.py
[root@localhost project]# kill -9 1244

Method 3: use fg to bring a background job back to foreground.

[root@localhost project]# jobs
[1]+  Running                 python server.py &
[root@localhost project]# fg 1
python server.py
^C
Copyright by: www.linuxoperatingsystem.info http://goo.gl/kMscJ4
Read More...

Monday, February 23, 2015

ssh authentication refused

Leave a Comment
How To Create SSH Keys with PuTTY to Connect to a VPS. In this articles, to generate an SSH key with PuTTYgen, follow these steps:

1. Create a PuTTY Profile to Save Your Server's Settings
Step 1:
ssh authentication refused

Step 2:


Step 3:

Copy public key to remote server, private key locate in client.
Server side: re-name public key -> authorized_keys, use mv command
# vim /home/huupv/.ssh/authorized_keys
For example authorized_keys file:
ssh-rsa AAAAB3NzaC1yc2EAAAABJQAAAQEArPk6AUwiyKwi7zypuERG1+Bjw4dC+aFXJs13hfYsZ//Y30tRJPaivWw8X4444X/nXr1WS3hswFOSrtSXmwOpbN9SvscdqRbKSB9wL/HP1EGRZIonDfZPug48dJ3IUhx4XTtzBeS7q3HODbphTJeWwxwDG40N4hmK8QlMBzxJ5Veue+uxjsDaZsSVLZa2USlP2ggRGXJpJ8nYRGQnGJpBeYtGYn/+EAJ07AgFlQS+M/jkGqaOS1XYWagw== rsa-key-20150224
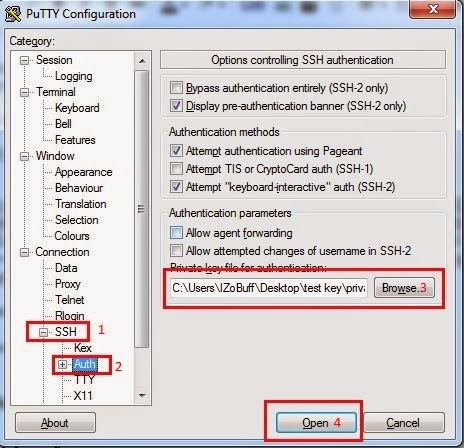
Client side: Hold private key extensive .ppk

Step 4: Connect to remote server


2. Configure sshd_config


# vim /etc/ssh/sshd_config
For example sshd_config file
# Package generated configuration file
# See the sshd_config(5) manpage for details
# What ports, IPs and protocols we listen for
Port 22
# Use these options to restrict which interfaces/protocols sshd will bind to
#ListenAddress ::
#ListenAddress 0.0.0.0
Protocol 2
# HostKeys for protocol version 2
HostKey /etc/ssh/ssh_host_rsa_key
HostKey /etc/ssh/ssh_host_dsa_key
HostKey /etc/ssh/ssh_host_ecdsa_key
HostKey /etc/ssh/ssh_host_ed25519_key
#Privilege Separation is turned on for security
UsePrivilegeSeparation yes
# Lifetime and size of ephemeral version 1 server key
KeyRegenerationInterval 3600
ServerKeyBits 1024
# Logging
SyslogFacility AUTH
LogLevel DEBUG3
# Authentication:
LoginGraceTime 120
PermitRootLogin no
StrictModes yes
RSAAuthentication yes
PubkeyAuthentication yes
AuthorizedKeysFile      %h/.ssh/authorized_keys
# Don't read the user's ~/.rhosts and ~/.shosts files
IgnoreRhosts yes
# For this to work you will also need host keys in /etc/ssh_known_hosts
RhostsRSAAuthentication no
# similar for protocol version 2
HostbasedAuthentication no
# Uncomment if you don't trust ~/.ssh/known_hosts for RhostsRSAAuthentication
#IgnoreUserKnownHosts yes
# To enable empty passwords, change to yes (NOT RECOMMENDED)
PermitEmptyPasswords no
# Change to yes to enable challenge-response passwords (beware issues with
# some PAM modules and threads)
ChallengeResponseAuthentication no
# Change to no to disable tunnelled clear text passwords
PasswordAuthentication no

X11Forwarding yes
X11DisplayOffset 10
PrintMotd no
PrintLastLog yes
TCPKeepAlive yes
#UseLogin no
#MaxStartups 10:30:60
#Banner /etc/issue.net
# Allow client to pass locale environment variables
AcceptEnv LANG LC_*
Subsystem sftp /usr/lib/openssh/sftp-server
# Set this to 'yes' to enable PAM authentication, account processing,
# and session processing. If this is enabled, PAM authentication will
# be allowed through the ChallengeResponseAuthentication and
# PasswordAuthentication.  Depending on your PAM configuration,
# PAM authentication via ChallengeResponseAuthentication may bypass
# the setting of "PermitRootLogin without-password".
# If you just want the PAM account and session checks to run without
# PAM authentication, then enable this but set PasswordAuthentication
# and ChallengeResponseAuthentication to 'no'.
UsePAM yes


Troubleshooting

Server refused our key
SSH Authentication Refused: Bad Ownership or Modes for Directory

Feb 22 10:15:44 www sshd[2318]: debug3: mm_answer_authserv: service=ssh-connection, style=, role=
Feb 22 10:15:44 www sshd[2318]: debug2: monitor_read: 4 used once, disabling now
Feb 22 10:15:44 www sshd[2318]: debug3: mm_request_receive entering
Feb 22 10:15:44 www sshd[2318]: debug3: monitor_read: checking request 22
Feb 22 10:15:44 www sshd[2318]: debug3: mm_answer_keyallowed entering
Feb 22 10:15:44 www sshd[2318]: debug3: mm_answer_keyallowed: key_from_blob: 0x7f653e401d80
Feb 22 10:15:44 www sshd[2318]: debug1: temporarily_use_uid: 1000/1000 (e=0/0)
Feb 22 10:15:44 www sshd[2318]: debug1: trying public key file /home/huupv/.ssh/authorized_keys
Feb 22 10:15:44 www sshd[2318]: debug1: Could not open authorized keys '/home/huupv/.ssh/authorized_keys': Permission denied
Feb 22 10:15:44 www sshd[2318]: debug1: restore_uid: 0/0
Feb 22 10:15:44 www sshd[2318]: Failed publickey for huupv from 192.168.177.1 port 50057 ssh2: RSA 17:05:6c:1e:fa:d2:e3:fe:02:1f:04:7a:4b:f1:1b:1e
Feb 22 10:15:44 www sshd[2318]: debug3: mm_answer_keyallowed: key 0x7f653e401d80 is not allowed
Feb 22 10:15:44 www sshd[2318]: debug3: mm_request_send entering: type 23
Feb 22 10:15:44 www sshd[2318]: debug2: userauth_pubkey: authenticated 0 pkalg ssh-rsa [preauth]
Feb 22 10:15:44 www sshd[2318]: debug3: userauth_finish: failure partial=0 next methods="publickey,password" [preauth]

Solve problem:

chmod g-w /home/huupv
chmod 700 /home/huupv/.ssh
chmod 600 /home/huupv/.ssh/authorized_keys


Copyright by: www.linuxoperatingsystem.info http://goo.gl/kMscJ4
Read More...

Friday, February 6, 2015

use dd command to clone hard drive

Leave a Comment
For examples, use dd command to clone hard drive on linux system

How to determine find out file system type

# df -T
Output
huupv@mailserver:~$ df -T
Filesystem     Type     1K-blocks    Used Available Use% Mounted on
/dev/sdb2      ext4      19548440 1659364  16873012   9% /
udev           devtmpfs    236536       4    236532   1% /dev
tmpfs          tmpfs        49408     300     49108   1% /run
none           tmpfs         5120       0      5120   0% /run/lock
none           tmpfs       247032       0    247032   0% /run/shm

Check block size device 

# blockdev --getbsz /dev/sdb2
Output
4096

Create filesytem format

# mkfs.ext4 /dev/sdb2

Create swap partition

# mkswap /dev/sdb3

Enable swap partition

# swapon /dev/sdb3

List disk partition 

# lsblk 
Output
huupv@mailserver:~$ sudo lsblk
NAME   MAJ:MIN RM   SIZE RO TYPE MOUNTPOINT
sda      8:0    0    20G  0 disk
├─sda1   8:1    0   953M  0 part
└─sda2   8:2    0  19.1G  0 part /
sdb      8:16   0    22G  0 disk
├─sdb1   8:17   0   953M  0 part [SWAP]
└─sdb2   8:18   0  19.1G  0 part
sr0     11:0    1   689M  0 rom

How to find uuids of disk

# blkid 
Output
huupv@mailserver:~$ sudo blkid
/dev/sr0: LABEL="Ubuntu-Server 12.04.5 LTS amd64" TYPE="iso9660"
/dev/sda1: UUID="1db9efd1-b0b3-4d89-a4d6-7848caddaa77" TYPE="swap"
/dev/sda2: UUID="e2e91a32-92ee-464d-ae57-1f02a76adde3" TYPE="ext4"
/dev/sdb1: UUID="1db9efd1-b0b3-4d89-a4d6-7848caddaa77" TYPE="swap"
/dev/sdb2: UUID="e2e91a32-92ee-464d-ae57-1f02a76adde3" TYPE="ext4"
or
# ls -l /dev/disk/by-uuid/

Cloning a partition use dd command

# dd if=/dev/sda1 of=/dev/sdb1 bs=512 conv=noerror,sync
Note: of=/dev/sdb1 >= if=/dev/sda1

Cloning an entire partition use dd command

dd if=/dev/sda of=/dev/sdb bs=512 conv=noerror,sync
MBR Total Size

446 + 64 + 2 = 512

Where,
446 bytes - Bootstrap.
64 bytes - Partition table.
2 bytes - Signature.

Link youtube use dd command to clone hard drive bellow :

https://youtu.be/G7VNWFzWgjI

Copyright by: www.linuxoperatingsystem.info http://goo.gl/kMscJ4
Read More...

Friday, January 2, 2015

Changing permissions use chmod command in linux

Leave a Comment
How to change permissions in linux? To change the permissions for file or directory in linux, you use chmod command. in this articles, descriptions and step by step via for example.

chmod command

The chmod command use two arguments at minimum: the criteria/numeric and filename to change.

Syntax
chmod [Criteria/numeric ] [file-to-change]

chmod command
Criteria
chmod command
numeric 

For example chmod command

For example use criteria
[root@localhost ~]# ls -l
total 28
drwxr-xr-x. 5 root root 4096 Nov 14 13:12 newfolder
drwxr-xr-x. 2 root root 4096 Dec 18 19:17 perlPro
-rw-r--r--. 1 root root  606 Nov 13 05:56 test1-rw-r--r--. 1 root root  618 Nov 13 05:48 test2
-rw-r--r--. 1 root root   35 Nov 13 05:52 test3
-rw-r--r--. 1 root root   72 Nov 14 22:23 test4
-rw-r--r--. 1 root root    9 Nov 18 00:33 test6
Change the permissions test1 file with : user: read, write, execute. Group: Read, Write. Other: execute
[root@localhost ~]# chmod u+rwx,g+rw,o+x test1[root@localhost ~]# ls -l
total 28
drwxr-xr-x. 5 root root 4096 Nov 14 13:12 newfolder
drwxr-xr-x. 2 root root 4096 Dec 18 19:17 perlPro
-rwxrw-r-x. 1 root root  606 Nov 13 05:56 test1-rw-r--r--. 1 root root  618 Nov 13 05:48 test2
-rw-r--r--. 1 root root   35 Nov 13 05:52 test3
-rw-r--r--. 1 root root   72 Nov 14 22:23 test4
-rw-r--r--. 1 root root    9 Nov 18 00:33 test6
Change the permissions test1 with: user: read. Group: read,write. other: nothing
[root@localhost ~]# chmod u-wx,o-rx test1[root@localhost ~]# ls -l
total 28
drwxr-xr-x. 5 root root 4096 Nov 14 13:12 newfolder
drwxr-xr-x. 2 root root 4096 Dec 18 19:17 perlPro
-r--rw----. 1 root root  606 Nov 13 05:56 test1-rw-r--r--. 1 root root  618 Nov 13 05:48 test2
-rw-r--r--. 1 root root   35 Nov 13 05:52 test3
-rw-r--r--. 1 root root   72 Nov 14 22:23 test4
-rw-r--r--. 1 root root    9 Nov 18 00:33 test6
For example use numeric
[root@localhost ~]# ls -l
total 28
drwxr-xr-x. 5 root root 4096 Nov 14 13:12 newfolder
drwxr-xr-x. 2 root root 4096 Dec 18 19:17 perlPro
-r--rw-r--. 1 root root  606 Nov 13 05:56 test1
-rw-r--r--. 1 root root  618 Nov 13 05:48 test2
-rw-r--r--. 1 root root   35 Nov 13 05:52 test3
-rw-r--r--. 1 root root   72 Nov 14 22:23 test4
-rw-r--r--. 1 root root    9 Nov 18 00:33 test6
Change the permissions test2 file: user: Read, Write, execute. Group: Read, Execute. Other: nothing
[root@localhost ~]# chmod 750 test2[root@localhost ~]# ls -l
total 28
drwxr-xr-x. 5 root root 4096 Nov 14 13:12 newfolder
drwxr-xr-x. 2 root root 4096 Dec 18 19:17 perlPro
-r--rw-r--. 1 root root  606 Nov 13 05:56 test1
-rwxr-x---. 1 root root  618 Nov 13 05:48 test2-rw-r--r--. 1 root root   35 Nov 13 05:52 test3
-rw-r--r--. 1 root root   72 Nov 14 22:23 test4
-rw-r--r--. 1 root root    9 Nov 18 00:33 test6
Copyright by: www.linuxoperatingsystem.info http://goo.gl/kMscJ4
Read More...

Monday, December 29, 2014

linux file permissions

Leave a Comment
Linux file permissions, the after you log-in with username and password to gain access to a linux system. All access to resources in linux system the user and password have to required permission.

what does Ownership mean

when you create a file or directory, that user's name and primary group become the owner and group owner of the file or directory.

Note: Only two user on linux system can modify or change permissions on file or directory: The owner of the file or directory and root user.

what does mode mean

Every file and directory on linux filesystem contains information permissions in inode. The section of inode that store information permissions called mode. Mode divided into three section as picture below in linux file permissions:
linux file permissions

To use ls command with option -l to display the linux file permissions.
[root@localhost test]# ls -l
total 4
drwxr-xr-x 2 root root 4096 Dec 30 10:24 folder
-rw-r--r-- 1 root root    0 Dec 30 10:24 test01
-rw-r--r-- 1 root root    0 Dec 30 10:24 test02
As comment atop, test01 file permissions -rw-r--r--  user: read, write group: read and other: read
Note:

  • Read: Allow a user to open and read the file
  • Write: Allow a user to open, read and edit the file
  • Execute: Allow a user to execute the file in memory

To view current user name: the use whoami command
[root@localhost ~]# whoami
root
To view group memberships and primary group: the use groups command.
[root@localhost ~]# groups
root bin daemon sys adm disk wheel
To change the owner of the file or directory use chown command.
Syntax: two arguments at minimum
chown [option] [new owner] [file/directories]
For example no option:
[root@localhost test]# chown apache test01
[root@localhost test]# ls -l
total 4
drwxr-xr-x 2 root   root 4096 Dec 30 10:24 folder
-rw-r--r-- 1 apache root    0 Dec 30 10:24 test01
-rw-r--r-- 1 root   root    0 Dec 30 10:24 test02

To change the group owner of the file or directory use chgrp command
Syntax: two arguments at minimum
chgrp [option] [new owner] [file/directories]
For example no option:
[root@localhost test]# chgrp apache test01
[root@localhost test]# ls -l
total 4
drwxr-xr-x 2 root   root   4096 Dec 30 10:24 folder
-rw-r--r-- 1 apache apache    0 Dec 30 10:24 test01
-rw-r--r-- 1 root   root      0 Dec 30 10:24 test02

To change the owner and the group owner at them same time using chown command
For example no option:
[root@localhost test]# chown nginx.nginx test01
[root@localhost test]# ls -l
total 4
drwxr-xr-x 2 root  root  4096 Dec 30 10:24 folder
-rw-r--r-- 1 nginx nginx    0 Dec 30 10:24 test01
-rw-r--r-- 1 root  root     0 Dec 30 10:24 test02
Some examples the basic of linux file permissions as atop, i hope will this hope you!

Copyright by: www.linuxoperatingsystem.info http://goo.gl/kMscJ4
Read More...

Monday, December 1, 2014

ssh config

Leave a Comment

what is ssh? 

SSH is a protocol to log-in remote server. it's the most common way to access remote server in linux system and linux commands is useful in linux system, in this articles, how to ssh config?

Syntax:

ssh remote_username@remote_host 
ssh config

Note:
  • remote_username: user of server you wish remote access.
  • remote_host: ip address or domain name of remote access the server.

how does ssh work?

SSH works by a client program which it's connecting to an ssh server. Client-side as command above and server-side  service sshd server already running.

Basic of ssh config

SSH config the store in /etc/ssh/sshd_config file.
vi /etc/ssh/sshd_config

Disable or enable root log-in

PermitRootLogin yes
if you allow root access thought ssh use as command above, contrary.

Change port ssh

Default ssh port 22, you can change port non-standard.
Port 8888
Note: you check firewall in centos actually open . if firewall not open port 8888 you open port 8888 as command line bellow:
 firewall-cmd --zone=public --query-port=8888/tcp


Open the port 8888 in firewall using command line as bellow:
firewall-cmd --zone=public --add-port=8888/tcp --permanent
Restart ssh config:
systemctl reload sshd.service
you can via linux firewall to more detail:

Other configuration 

# Authentication:
LoginGraceTime 2m
StrictModes yes
MaxAuthTries 6
MaxSessions 10 

How to login ssh use keys

Log-in ssh use keys a better idea for secure to access remote server. Key-base authentication works by creating a pair of keys:

  • Private key: the located on the client
  • Public key: the located on server you wish access and for anyone.

How to create SSH keys

Enter the following into the command line and press enter by default:
ssh-keygen -t rsa

The command above create 2 file in hidden ~/.ssh folder :  ~/.ssh/id_rsa.pub and ~/.ssh/id_rsa.

Change to ssh directory use cd command as bellow:
cd ~/.ssh 
ls -l

How to transfer public key to the server

ssh-copy-id remote_host
I hope will this help you!
Copyright by: www.linuxoperatingsystem.info http://goo.gl/kMscJ4
Read More...

Friday, November 21, 2014

ln command

Leave a Comment
using ln command to create symblock link and hard link in linux operating system.

Two concepts:

  • symbolic link a one file is a pointer or to another file. 
  • hard link two files share the same data and same inode .

how files are linked, how files are stored on a filesystem. A filesystem has three main:

superblock is contains information about the filesystem in general such as the number of inodes and data blocks.
inode table consists of several inodes and more important store information such as: the file
size, permissions etc.
Data block is data that make up the contents of the file.

The structure:

ln command
Hard link


ln command 02
symbolic link


To create hard link use ln command:

# ln existing-file target-file

To create symbolic link use ln command with -s option:

# ln -s link-to-file  file
Examples ln command:

# ln file1 file2
# ln -s file3 file4
Copyright by: www.linuxoperatingsystem.info http://goo.gl/kMscJ4
Read More...

Sunday, November 16, 2014

vim command linux

Leave a Comment
vim command is operator 2 mode: normal mode, insert mode.Vim is an editor to create or edit a text file.

Note: 

Pressing <ESC> to return Nomarl mode to performing commands the below:

Moving the cursor:

To move the cursor, press key:

h: move left
j: move below
k: move top
l: move right

Motion the curson:

type w to move the cursor words forward
type e to move the cursor to the end of the word forward
type 0 (zero) to move to the start of the line.

Exiting VIM:

press <ESC> key ---> type :q!<ENTER> to not save all changes.
press <ESC> key ---> type :wq<ENTER> to save the changes.

Text editing - insertion:

press i key insert before the cursor
press A key appended text after the line

Deletion commands:

To delete a word, press dw 
To delete the character at the cursor type: x
To delete a whole line, type dd

The undo command:

press u key to undo the last commands
press U (capital U) to undo all the changes on a line
type CTRL-R to redo the commands (undo the undo's)

The replace command:

type r key then the character you want EX: type ra to replace the character at the cursor with a

Cursor location and file status:

Type CTRL-G to show your location and file status: type G to move the bottom of file and Type gg to move to the start of the file

The search command:

Type /<a phrase><ENTER> ex /huuphang-->ENTER press.
To search for the same phrase again, type n
To search for thesame phrase in the opposite direction, type N

Matching parentheses search:

type % to find a matching ),], or }. place the cursor on any (,[, or {, then type % character

The substitute command:

To substitute phang for the first huu in a line, type  :s/huu/phang
To substitute phang for all 'huu's on a line type  :s/huu/phang/g
To substitute phrases between two line #'s type  :#,#s/huu/phang/g
To substitute all occurrences in the file type  :%s/huu/phang/g
To ask for confirmation each time add 'c'  :%s/huu/phang/gc

How to execute an external command:

Type :!<external command> ex: :!ls

Writing files:

type :w filename

Selecting text to write:

move the cursor to line, type v then :w filename

Retrieving and merging files:

To insert the contents of a file, type :r filename

Copyright by: www.linuxoperatingsystem.info http://goo.gl/kMscJ4
Read More...

Friday, November 14, 2014

ls command alongside wildcard metacharacters

Leave a Comment
ls command alongside wildcard metacharacters. in this articles, examples about ls command.

Note:

Metacharacters Descriptions
* Matches 0 or more characters in a filename
? Matches 1 character in a filename
[1-3] Matches 1 character in a filename, either: 1,2 or 3
[!1-3] Matches 1 character in a filename, either is not : 1,2 or 3

Switch to a commmand-line terminal, by pressing ctrl+Alt+F2 and login:
username: root
password: password of root
At the command prompt, type pwd-> press Enter

At the command prompt ,type ls command, how many files with "test" filename
ls command

At the command prompt ,type ls * command, results output :

At the command prompt ,type ls test? command, results output :

At the command prompt , type ls test?? command, results output :

At the command prompt , type ls test[13] command, results output:

At the command prompt , type ls test[!13] command, results output:

ls command use list directory content , i hope will this help you!
Copyright by: www.linuxoperatingsystem.info http://goo.gl/kMscJ4
Read More...

linux most useful command

Leave a Comment
linux most useful command: cat command, strings command, cp command, mv command, which command etc.

1. Display file contents:

Command Descriptions
cat Displaying the Contents of Text Files
tac Displaying the Contents of Text Files in reverse order
head Displaying the Contents of Text Files the first 10 lines
tail Displaying the Contents of Text Files the final 10 lines 
strings Displaying the contents of binary files
od Displaying the contents of the file in octal format
more Displaying the Contents of Text Files page-by-page
less like more command, but more than more command

Managing files and directories:


Command Descriptions
mkdir create directory 
mv move or rename files and directory
cp copy files and directory
rm remove files
rmdir remove empty directory


Note: cp, rm, rmdir commands using option -R to recursive copy directories, to remove a directory full of files. rm command with -R is dangerous.

Finding files:

Command Descriptions
locate fastest to search for files in linux directory tree
find slower to search for files,but useful.
which To search the directories in the PATH variable

Note: to see content of a certain variable in memory using echo $PATH.

Update later:

Copyright by: www.linuxoperatingsystem.info http://goo.gl/kMscJ4
Read More...

Thursday, November 13, 2014

How to examine files and file types using ls and file commands

Leave a Comment

In linux operating system, the most common file include the following:

● Text files
● Binary data files
● Executable program files
● Directory files
● Linked files
● Special device files
● Named pipes and sockets

To view a list of files and their types use : ls –F command, End file of each filename:

Symbol Descriptions
@ symbol a linked file
* symbol an executable file
/ symbol a directory files
= symbol a socket file
| symbol a named pip
* symbol an executable file

*Note: all other file type do not have a special character appended to them ex: text files,binary data files or special device files


Results output:


To obtain more detailed information about each file. use : ls -l command

Results output:

Each file has eight components

1. a file type character
                d : a directory
                l: a symbol linked file
                b and c: special device files
                n: a named pipe
                s: a socket
                -: all other file types( text files,binary data files)
2.A list of permissions on the file
3.A hard link count
4.The owner of the file
5.The group of the file
6.The file size (bytes)
7.The most recent modification time of the file
8.The filename

To display file type of any file use file command

For example below:

At the command prompt, type :
                # pwd
                # ls –aF /dev
At the command prompt, type:
                # ls –l /dev
At the command prompt, type:
                # file /dev
At the command prompt, type:
                # file /dev/MAKEDEV
Copyright by: www.linuxoperatingsystem.info http://goo.gl/kMscJ4
Read More...